Hello you all,
I’ve been working on a lock system for a while, I started looking for some codes to use in my project but unfortunately, I found a lot of complex ones, and most of them have some fails especially when they use pointers, you can try them and you’ll find their problems.
And so I’ve decided to look through the Keypad library functions and I’ve found a way as a beginner to make a simple code, easy to use, easy to understand and easy to modify for you’re own DIY projects.
Hope you like it.
You’ll need:
-Arduino board:
-4×4 Keypad matrix (you can use the 4×3 but you have to do some modifications)
-LCD i2c screen
Step 1: Wiring and Code
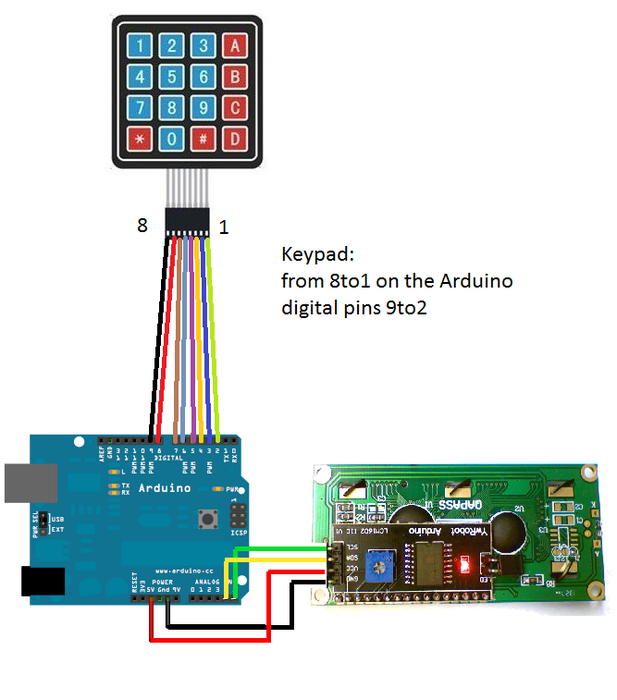
The wiring is like in the picture.
And here’s the code I used:
/* Arduino Unlocking code to use with you're own mechanism, here it's used to show a welcome or not <br> *  message on a lcd i2c screen
 *  The wiring is (keypad from 8to1) to arduino digital pins(9to2)
 *  lcd i2c on (5v,GND, SDA on A4 SCL on A)
 *  By SurtrTech
 */
#include <keypad.h> //Libraries you can download them via Arduino IDE
#include <wire.h>
#include <lcd.h>
#include
<liquidcrystal_i2c.h></liquidcrystal_i2c.h></lcd.h></wire.h></keypad.h>
#define I2C_ADDR 0x27 // LCD i2c Adress and pins
#define BACKLIGHT_PIN 3
#define En_pin 2
#define Rw_pin 1
#define Rs_pin 0
#define D4_pin 4
#define D5_pin 5
#define D6_pin 6
#define D7_pin 7
LiquidCrystal_I2C lcd(I2C_ADDR,En_pin,Rw_pin,Rs_pin,D4_pin,D5_pin,D6_pin,D7_pin);
const byte numRows= 4; //number of rows on the keypad
const byte numCols= 4; //number of columns on the keypad
int code = 1366;  //The code I used, you can change it
int tot,i1,i2,i3,i4;
char c1,c2,c3,c4;
//keymap defines the key pressed according to the row and columns just as appears on the keypad
char keymap[numRows][numCols]=
{
{'1', '2', '3', 'A'},
{'4', '5', '6', 'B'},
{'7', '8', '9', 'C'},
{'*', '0', '#', 'D'}
};
//Code that shows the the keypad connections to the arduino terminals
byte rowPins[numRows] = {9,8,7,6}; //Rows 0 to 3
byte colPins[numCols]= {5,4,3,2}; //Columns 0 to 3
//initializes an instance of the Keypad class
Keypad myKeypad= Keypad(makeKeymap(keymap), rowPins, colPins, numRows, numCols);
void setup()
           {
            lcd.begin (16,2);
            lcd.setBacklightPin(BACKLIGHT_PIN,POSITIVE);
            lcd.setBacklight(HIGH);
            lcd.home ();
            lcd.print("SurtrTech");
            lcd.setCursor(9, 1);
            lcd.print("Standby");
            delay(2000);
           }
void loop()
{
      char keypressed = myKeypad.getKey();  //The getKey fucntion keeps the program runing, as long you didn't press "*" the whole thing bellow wouldn't be triggered
         if (keypressed == '*')             // and you can use the rest of you're code simply
             {
               lcd.clear();
               lcd.setCursor(0, 0);
               lcd.print("Enter Code");                  //when the "*" key is pressed you can enter the passcode
                    keypressed = myKeypad.waitForKey();  // here all programs are stopped until you enter the four digits then it gets compared to the code above
                    if (keypressed != NO_KEY)
                      {
                       c1 = keypressed;
                       lcd.setCursor(0, 1);
                       lcd.print("*");
                       }
                    keypressed = myKeypad.waitForKey();
                    if (keypressed != NO_KEY)
                      {
                       c2 = keypressed;
                       lcd.setCursor(1, 1);
                       lcd.print("*");
                       }
                     keypressed = myKeypad.waitForKey();
                   if (keypressed != NO_KEY)
                      {
                       c3 = keypressed;
                       lcd.setCursor(2, 1);
                       lcd.print("*");
                       }
                      keypressed = myKeypad.waitForKey();
                   if (keypressed != NO_KEY)
                      {
                       c4 = keypressed;
                       lcd.setCursor(3, 1);
                       lcd.print("*");
                       }
                     i1=(c1-48)*1000;        //the keys pressed are stored into chars I convert them to int then i did some multiplication to get the code as an int of xxxx
                     i2=(c2-48)*100;
                     i3=(c3-48)*10;
                     i4=c4-48;
                     tot=i1+i2+i3+i4;


         if (tot == code) //if the code is correct you trigger whatever you want here it just print a message on the screen
         {
          lcd.clear();
          lcd.setCursor(0, 0);
          lcd.print("Welcome");
          lcd.setCursor(7, 1);
          lcd.print("SurtrTech");
          delay(3000);
          lcd.clear();
          lcd.print("SurtrTech");
          lcd.setCursor(9, 1);
          lcd.print("Standby");

         }
         else //if the code is wrong you get another thing
         {
          lcd.clear();
          lcd.setCursor(0, 0);
          lcd.print("GTFO LOL");
          delay(3000);
          lcd.clear();
          lcd.print("SurtrTech");
          lcd.setCursor(9, 1);
          lcd.print("Standby");

         }

              }
}
Step 2: Add to Your Own Project
As you see it’s easy and simple.
Here I used it to show a message on the screen, you can add activating servos, relays, buzzers…
You can add it if you like to your projects,like generating passcode with an App using internet or bluetooth, or the ones when you set you’re own passcode with the keypad…
Hope you like it.


